Share
Results 1 to 10 of 10

Thread: Project 1 from Rambozo. Category: Custom Automotive Off Road Welding

Hybrid View

Previous Post Previous Post   Next Post Next Post
  1. #1
    Join Date
    May 2012
    Location
    Disneyland
    Posts
    2,662

    Arrow Project 1 from Rambozo. Category: Custom Automotive Off Road Welding

    I've been meaning to post this project, I actually finished it before my 140ST came, so no Everlast on this. It does have MIG, TIG, and SMAW just because of the situation or what would work best. The TIG was mostly my CyberTIG, the stick was a Miller Thunderbolt, and the MIG was a Century 120 volt mostly used for tacking.
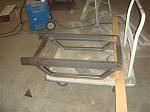
    This is going to be a tractor mounted weed sprayer. Started from the bottom with the skids. Cut up some square tube for them, and TIG welded them up. Smoothed the sides a little. Because my original plan called for a lot more 45° joints, I made up a 22.5° square to check parts and set the saw. Then started on the upper cage parts. The lower rails are 3" channel and I welded them and the skids with stick.

    Click image for larger version. 

Name:	Projects 618.JPG 
Views:	790 
Size:	90.7 KB 
ID:	8061 Click image for larger version. 

Name:	Projects 623.JPG 
Views:	789 
Size:	96.4 KB 
ID:	8062 Click image for larger version. 

Name:	Projects 627.JPG 
Views:	727 
Size:	79.2 KB 
ID:	8063 Click image for larger version. 

Name:	Projects 633.JPG 
Views:	775 
Size:	84.4 KB 
ID:	8064 Click image for larger version. 

Name:	Projects 634.JPG 
Views:	771 
Size:	72.1 KB 
ID:	8065

    Here is the finished frame attached to the tractor, then lifted on the 3 point. The mounts keep it level at all times. The tank is recycled from another sprayer, it's 100 gallons. Then I added mounts for the equipment, and gave it some paint. The customer likes everything done in white for some reason. Wouldn't be my first choice for somthing like this.

    Click image for larger version. 

Name:	Projects 637.JPG 
Views:	758 
Size:	70.7 KB 
ID:	8066 Click image for larger version. 

Name:	Projects 640.JPG 
Views:	761 
Size:	80.4 KB 
ID:	8067 Click image for larger version. 

Name:	Projects 642.JPG 
Views:	754 
Size:	71.8 KB 
ID:	8068 Click image for larger version. 

Name:	Projects 645.JPG 
Views:	756 
Size:	61.2 KB 
ID:	8069
    Last edited by Rambozo; 09-28-2012 at 01:36 AM.
    Long arc, short arc, heliarc and in-the-dark!

  2. #2
    Join Date
    May 2012
    Location
    Disneyland
    Posts
    2,662

    Default

    Here it is all assembled and installed. I added a pressure guage and a couple of switches to the tractor. The PTO pump was recycled from yet another sprayer project and setup with camlock fittings. There are two motorized ball valves that control two boomless spray nozzles. They spray about 20' to each side for a 40' total swath. The strainer is accessable through the gap above the skids, and there is an air gap setup for filling the tank, also with a camlock for the hose. The electrics connect with a twist lock plug and a quick release hose fitting for the pressure guage. The pressure is controlled by engine RPM and there is a small manual bypass valve to operate a jet agitation system inside the tank.

    Click image for larger version. 

Name:	Projects 676.JPG 
Views:	717 
Size:	59.8 KB 
ID:	8071 Click image for larger version. 

Name:	Projects 678.JPG 
Views:	734 
Size:	75.3 KB 
ID:	8073 Click image for larger version. 

Name:	Projects 680.JPG 
Views:	731 
Size:	91.2 KB 
ID:	8074 Click image for larger version. 

Name:	Projects 681.JPG 
Views:	706 
Size:	52.1 KB 
ID:	8075 Click image for larger version. 

Name:	Projects 684.JPG 
Views:	708 
Size:	33.6 KB 
ID:	8076 Click image for larger version. 

Name:	Projects 690.JPG 
Views:	684 
Size:	60.2 KB 
ID:	8077 Click image for larger version. 

Name:	Projects 691.JPG 
Views:	737 
Size:	57.1 KB 
ID:	8072
    Long arc, short arc, heliarc and in-the-dark!

  3. #3
    Join Date
    May 2012
    Location
    Disneyland
    Posts
    2,662

    Default

    Next up was some add on for hand spraying. More miter cuts. If I did this a lot I would get a few saws so I could leave them set at different angles. Tacked things up and checked the fit. This is going to hold this reel using the mounting for the front weights. Another TIG job. Welded up and fits fine. Paint and install. Since the tractor frame is gray I went with that instead of more aweful white.

    Click image for larger version. 

Name:	Projects 692.JPG 
Views:	727 
Size:	73.4 KB 
ID:	8079 Click image for larger version. 

Name:	Projects 697.JPG 
Views:	720 
Size:	92.2 KB 
ID:	8081 Click image for larger version. 

Name:	Projects 696.JPG 
Views:	711 
Size:	87.2 KB 
ID:	8080 Click image for larger version. 

Name:	Projects 701.JPG 
Views:	703 
Size:	56.3 KB 
ID:	8082 Click image for larger version. 

Name:	Projects 708.JPG 
Views:	712 
Size:	88.1 KB 
ID:	8083 Click image for larger version. 

Name:	Projects 710.JPG 
Views:	771 
Size:	95.5 KB 
ID:	8084 Click image for larger version. 

Name:	Projects 711.JPG 
Views:	744 
Size:	89.8 KB 
ID:	8085 Click image for larger version. 

Name:	Projects 717.JPG 
Views:	706 
Size:	73.5 KB 
ID:	8086

    And lastly another recycled spray gun holder cut off something and welded to a new mounting to go where some stock handle was on the fender.

    Click image for larger version. 

Name:	Projects 719.JPG 
Views:	739 
Size:	85.2 KB 
ID:	8087 Click image for larger version. 

Name:	Projects 721.JPG 
Views:	712 
Size:	31.5 KB 
ID:	8078

    And because I was trying to explain something to someone, I shot a video of my oddball unconventional stick technique. I don't always do this, but it works for me to be steady with a full length electrode and no place to prop or if I can't use both hands. I just hold the electrode, and let the stinger rest on the back of my hand.

    Long arc, short arc, heliarc and in-the-dark!

  4. #4
    Join Date
    Apr 2012
    Location
    Washington State
    Posts
    723

    Default

    Cool project! I like your unconventional stick welding technique. I've wondered what other people do to steady the rod when it is fresh. Especially the longer rods. I'm not sure I'll be doing that myself but it sure was interesting to watch!
    Is it OK to want to break something just so that you can weld it back together?

    Everlast PowerTIG 185 Micro IGBT AC/DC Welder

  5. #5
    Join Date
    May 2012
    Location
    Disneyland
    Posts
    2,662

    Default

    I know Jody at WT&T breaks off the flux to shorten the rod, but I guess I'm too cheap to waste rods like that.
    Long arc, short arc, heliarc and in-the-dark!

  6. #6
    Join Date
    Apr 2012
    Location
    Washington State
    Posts
    723

    Default

    Quote Originally Posted by Rambozo View Post
    I know Jody at WT&T breaks off the flux to shorten the rod, but I guess I'm too cheap to waste rods like that.
    I saw that video. You aren't alone. LOL I'd be trying your technique before I resort to losing a bit of rod. Shoot, I burn 'em right down to the nub ....
    Is it OK to want to break something just so that you can weld it back together?

    Everlast PowerTIG 185 Micro IGBT AC/DC Welder

Similar Threads

  1. Project 2 from Rambozo. Category: Automotive On Road Trailer Jack
    By Rambozo in forum Other Custom Fabrications
    Replies: 5
    Last Post: 07-01-2015, 07:56 AM
  2. Replies: 10
    Last Post: 02-19-2013, 01:26 PM
  3. Replies: 28
    Last Post: 12-10-2012, 12:21 AM
  4. Project 2 from Undercut. Category: Custom Automotive
    By undercut in forum Other Custom Fabrications
    Replies: 8
    Last Post: 10-03-2012, 10:38 PM
  5. Project 1 from Hooda. Category: 3) Custom Automotive on/off road Welding.
    By hooda in forum Personal Projects (no welder required)
    Replies: 8
    Last Post: 04-03-2012, 04:05 PM

Posting Permissions

  • You may not post new threads
  • You may not post replies
  • You may not post attachments
  • You may not edit your posts
  •