Share
Results 1 to 15 of 15

Thread: Project 1 from Rambozo. Category: General Welding repair

Hybrid View

Previous Post Previous Post   Next Post Next Post
  1. #1
    Join Date
    May 2012
    Location
    Disneyland
    Posts
    2,662

    Angry Project 1 from Rambozo. Category: General Welding repair

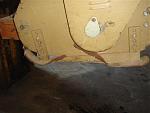
    First project for the contest, just the kind of work I hate to do. Hot, messy, rush job, and missing materials. Oh well, someone has to do it. Needed to fix both skids on a 60" flail mower.

    Kinda worn out.
    Click image for larger version. 

Name:	Projects 866.JPG 
Views:	714 
Size:	39.6 KB 
ID:	7462 Click image for larger version. 

Name:	Projects 869.JPG 
Views:	729 
Size:	60.4 KB 
ID:	7463

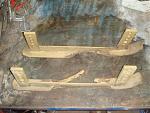
    Cut a couple of new skids from half inch thick abrasive plate steel.
    Click image for larger version. 

Name:	Projects 870.JPG 
Views:	752 
Size:	63.1 KB 
ID:	7464

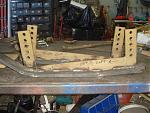
    Of course the shop is minus a bunch of stuff out on loan, one of which is the torch, so I ended up cutting a groove in them with a cutoff wheel about a quarter inch deep, then bending on the groove and welding the groove shut, instead of heating and bending. Welded them back to the mounting pieces. All with 7018AC and an old Miller Thunderbolt AC buzzbox. It's about the only thing left around here, but it worked fine.
    Click image for larger version. 

Name:	Projects 873.JPG 
Views:	737 
Size:	61.2 KB 
ID:	7465 Click image for larger version. 

Name:	Projects 875.JPG 
Views:	744 
Size:	59.2 KB 
ID:	7466 Click image for larger version. 

Name:	Projects 876.JPG 
Views:	782 
Size:	63.2 KB 
ID:	7467

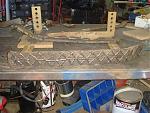
    What it had trouble with is the hardfacing I put on the bottom. I was only able to get 5/32 hardfacing rod instead of 1/8 and that little Miller had it's tongue out for that. AC is not the way to go, but it works and I'm hoping this will increase the lifespan. This mower is only about a year old and has not had a lot of use, but plenty of abuse. And of course it has to go out first thing in the morning for a job.
    Click image for larger version. 

Name:	Projects 879.JPG 
Views:	739 
Size:	67.4 KB 
ID:	7468 Click image for larger version. 

Name:	Projects 883.JPG 
Views:	747 
Size:	41.6 KB 
ID:	7469 Click image for larger version. 

Name:	Projects 884.JPG 
Views:	769 
Size:	42.4 KB 
ID:	7470
    Long arc, short arc, heliarc and in-the-dark!

  2. #2
    Join Date
    Apr 2012
    Location
    Washington State
    Posts
    723

    Default

    Would have never have known you were disadvantaged in terms of having the right equipment on hand. You did a great job. Question for you, how did you determine the pattern to use for the hardfacing? I hear there are some pretty differing views on this and was just curious how you came about the pattern you used. Cheers.
    Is it OK to want to break something just so that you can weld it back together?

    Everlast PowerTIG 185 Micro IGBT AC/DC Welder

  3. #3
    Join Date
    May 2012
    Location
    Disneyland
    Posts
    2,662

    Default

    I copied what I have seen on the sides of excavator buckets. Lincoln electric has a nice white paper on the subject. For best wear on dirt, you lay the beads across the path of motion, for rocks you lay the beads along the path of motion. This one has to deal with dirt and rocks, so I did the crosshatch pattern, then ran one last bead down the middle just for the hell of it.
    Long arc, short arc, heliarc and in-the-dark!

  4. #4
    Join Date
    Apr 2012
    Location
    Washington State
    Posts
    723

    Default

    Quote Originally Posted by Rambozo View Post
    I copied what I have seen on the sides of excavator buckets. Lincoln electric has a nice white paper on the subject. For best wear on dirt, you lay the beads across the path of motion, for rocks you lay the beads along the path of motion. This one has to deal with dirt and rocks, so I did the crosshatch pattern, then ran one last bead down the middle just for the hell of it.
    Thanks. Happen to have a link for that white paper? I'll google so no worries if you don't happen to have it handy.

    Cool, thanks for the link!
    Last edited by undercut; 07-29-2012 at 06:08 AM.
    Is it OK to want to break something just so that you can weld it back together?

    Everlast PowerTIG 185 Micro IGBT AC/DC Welder

  5. #5
    Join Date
    May 2012
    Location
    Disneyland
    Posts
    2,662

    Default

    Quote Originally Posted by undercut View Post
    Thanks. Happen to have a link for that white paper? I'll google so no worries if you don't happen to have it handy.
    http://www.lincolnelectric.com/asset...ture/C7710.pdf
    Long arc, short arc, heliarc and in-the-dark!

  6. #6
    Join Date
    Oct 2010
    Location
    Northern Virginia
    Posts
    1,323

    Default

    Hard to believe the machine is only a year old, with that kind of wear and tear! Did you get a look at the cutting area? Not sure if that one has blades or hammers, but if the skids were in that condition, I can only imagine what the cutters look like.

    Sure doesn't look like a rush job, nicely done.
    DaveO
    Oxweld oxy acet gear
    IMIG 200
    PowerTIG 210 EXT... Amazing!

Similar Threads

  1. Project 3 from Rambozo. Category: General Welding Repair
    By Rambozo in forum Welding Repairs
    Replies: 2
    Last Post: 02-10-2013, 01:11 PM
  2. Project 2 from Youngnstudly. Category: General Welding Repair
    By youngnstudly in forum Welding Repairs
    Replies: 7
    Last Post: 02-01-2013, 05:34 AM
  3. Project#3 from CGCINC. Category: General Welding Repair
    By CGCINC in forum Welding Repairs
    Replies: 5
    Last Post: 12-11-2012, 06:33 PM
  4. Project 2 from Rambozo. Category: General Welding Repair
    By Rambozo in forum Welding Repairs
    Replies: 5
    Last Post: 11-21-2012, 07:48 PM
  5. Project 1 from CGCINC: Category: General welding repair
    By CGCINC in forum Welding Repairs
    Replies: 15
    Last Post: 07-17-2012, 02:24 AM

Posting Permissions

  • You may not post new threads
  • You may not post replies
  • You may not post attachments
  • You may not edit your posts
  •