Share
Results 1 to 17 of 17

Thread: Using Helium for Aluminum Wheel Repair (jakeru's #19)

Hybrid View

Previous Post Previous Post   Next Post Next Post
  1. #1
    Join Date
    Dec 2009
    Location
    Greater Seattle, WA
    Posts
    813

    Default

    Dave, I think there may be forces at play that keep mixed gasses mixed and not let them separate out immediately (at least to some degree.)

    If the components in air separated out very quickly/readily, wouldn't we only get to breathe the densest contents (IE: argon) down at sea level? Anyhow, my neutral buoyancy theory should be something that I might be able to test. Here is something I just noticed - ck worldwide's guide to shielding gas flows recommendation chart, says 30% or less Helium (/Argon) mixes can use the same flow rate as for pure Argon:
    http://www.ckworldwide.com/tech-3.pdf
    (Kind of interesting they picked 30% as the cutoff point...)

    I'm excited because I'm up and running with not only a fresh argon bottle, but I also now have a "Y" setup. I've tried it so far, just flowing gas out of the torch (haven't done any arc tests yet), and so far so good. Both floating balls respond instantly when the gas solenoid opens, and adjusting one of the gas flows does not impact the flowrate of the other - perfect. I incorporated 1/4" NPT fittings into the "Y" connection, so I may be able to add checkvalves on later if desired. I put a standard outlet fitting (5/8-18 flare I believe) on the outlet of the "Y", so I can connect the same hose that connects direct to a regulator to the outlet of the "Y" (or back the other direction) as needed. (This was easier said than done... I had to weld two brass fittings together to make it happen!) Good stuff.

    Click image for larger version. 

Name:	IMG_0061.jpg 
Views:	692 
Size:	140.8 KB 
ID:	3071 Click image for larger version. 

Name:	IMG_0062.jpg 
Views:	697 
Size:	144.7 KB 
ID:	3070

    Edit: I just did some quick tests on various He/Ar mixes, run back to back. 0% He, 33% He, 66% He, 100% He, then repeated the sequence again, and a few other things. Just small 1" long beads run on 1/16" flat stock with 1/16" filler rod. I found something interesting only on the pure (100%) He, the glow of the arc was actually red in the middle, just off the tungsten. Around the red glowing zone, it had the normal green glow. On all other mixes, the arc didn't have the red glow at all, it was only the usual green. (This is though my auto-darkening lens, of course.) Pretty cool.

    I did all my test with 20% EP (minimum AC Balance my machine goes to), and it seems the 33%-66% He mixes could be useful in reducing the ethed zone while still providing some necessary cleaning. The 100% He had oxides in the puddle and a "crazed" cathodic etch pattern in the surfaces around the weld bead. I used 15 total cfh for most of the tests, but I did try boosting the cfh with heavy He concentrations to improve cleaning (I think I boosted it to 20cfh, which didn't seem to do much; maybe I need to boost to something crazier, like 30cfh.) This is with a #5, non-gas lens cup. I wasn't finding any evidence of smut or soot (of any kind) on any of these tests. I'm really glad I have the ability to vary the mix, and didn't get a pre-mixed bottle, this is cool. Oh yeah back to back going from He mixes back to pure argon, definite increase in the amount of foot pedal depression to get a puddle. I was using a 1/16" tungsten.

    There is a definite difference in noise of the He vs the Ar (as well as any major change in the relative mix) coming out of the TIG torch cup. In fact, after I vary the mix, I can hear it when the new gas mix starts making its way out of the TIG torch. (Doesn't take long for the new mix to get to the cup, about 2 seconds with my setup, I'd say.) Different noise the gases make "whistling" or "hissing" out of the cup, (or through the orifices in the collet body, perhaps.)
    Last edited by jakeru; 07-31-2011 at 06:49 AM.
    '13 Everlast 255EXT
    '07 Everlast Super200P

  2. #2

    Default

    Hey Jake,

    Any finished pictures after grind and polish? Or did you hand it off and say "there ya go".
    Mike R.
    Email: admineverlast@everlastwelders.com
    www.everlastgenerators.com
    www.everlastwelders.com
    877-755-9353 x203
    M-F 12 - 7PM PST
    FYI: PP50, PP80, IMIG-200, IMIG-250P, 210EXT and 255EXT.

  3. #3
    Join Date
    Dec 2009
    Location
    Greater Seattle, WA
    Posts
    813

    Default

    The customer is a professional wheel repair company, (and they are very skilled at grinding, straightening, and painting), so when doing welding jobs for them I worry about: leaving no low spots, leaving no stress risers (especially if it is likely that they will be bending them straight afterwards, as they usually do this immediately after receiving my welded wheels before and grinding), and leaving no porosity in any weld deposit. I don't need to worry about grinding, polishing, and painting, as this is what they do (and they do it really well; you usually can't even tell the wheel was worked on after they are done with it.) I'm pretty happy with the arrangement.

    I have done some final grinding/polishing on wheels but they are usually one-off projects for friends, and for some reason I seem to never take pictures of those projects. I did one for my brother about a week or two ago, it was an old bare polished aluminum wheel for a 1960's Chevy van. (They call them "mag" wheels but they were really aluminum.) Reconstructed the inner wheel lip where it was broken off. Ground the welded bead down with a flap wheel using a light touch and taking my time. No paint. Oh, we did do some "hot bending" with a weed burner and a big hammer on the wheel lip beforehand on that wheel too.

    Just last night, I ground some "curbage" out of the outer wheel lip of a painted cast wheel for a friend. (Purely for cosmetic reasons.) He had selected and tested a spray paint that was a near perfect color match, he was going to shoot over it. Didn't get any pics of that one either.
    '13 Everlast 255EXT
    '07 Everlast Super200P

  4. #4
    Join Date
    Mar 2011
    Location
    The Boonies of Texas
    Posts
    420

    Default

    I am mixing argon and c02 for my mig welding. I can't see the need to buy a separate setup when I have the pure products on hand. I may try some O2 in the mix since some of the mig gasses are a tri-mix for stainless and regular low alloy steel.

    Thurmond
    Miller Bobcat 3 Phase,
    Miller Suitcase X-Treme 12VS wire feeder for the Bobcat with M-25 300A .045" gun / Bernard 400A 5/64" wire mig gun .
    26 series gas cooled TIG torch, setup for quick connect to Bobcat.
    17 series gas cooled Tig Torch for Low Amp Solar Tig (Direct Solar Panel Powered Tig welding)
    Hobart Handler 187 Mig / Fluxcore
    EVERLAST PowerUltra 205P
    EVERLAST PowerTig 250 EXT 2013 Model

  5. #5

    Default

    Quote Originally Posted by Tritium View Post
    I am mixing argon and c02 for my mig welding. I can't see the need to buy a separate setup when I have the pure products on hand. I may try some O2 in the mix since some of the mig gasses are a tri-mix for stainless and regular low alloy steel.

    Thurmond
    Order some C18 or C25 for MIG. I would not bother mixing unless you are doing TIG on aluminum.
    Mike R.
    Email: admineverlast@everlastwelders.com
    www.everlastgenerators.com
    www.everlastwelders.com
    877-755-9353 x203
    M-F 12 - 7PM PST
    FYI: PP50, PP80, IMIG-200, IMIG-250P, 210EXT and 255EXT.

  6. #6
    Join Date
    Dec 2009
    Location
    Greater Seattle, WA
    Posts
    813

    Default

    Something remarkable I've discovered with the helium mix, at least at high penetration AC Balance settings (80% EN), is that it seems to take a lot of heat off the tungsten compared to using the same current with pure argon.

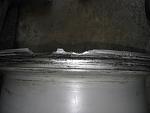
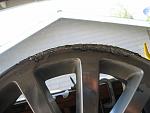
    Check out the pictures below. This was a crack repair of a .6" thick lip of an aluminum, automotive wheel, which is about the thickest wheel lip I have seen in such an application. It was also a 20"x9" wheel, and further stored in below freezing shop, so pretty big heat sink that needed a lot of heat to weld... 200 amps sustained for several seconds at a time, to be precise. I did grind a vee with a carbide burr on both sides and weld both sides, as was necessary to pull this off with full penetration with anywhere near of as narrow of a weld bead as is shown.

    Click image for larger version. 

Name:	IMG_0134.jpg 
Views:	750 
Size:	122.8 KB 
ID:	4672

    I used the same helium mix I have been using for a few months now for a lot of my aluminum, which is, in the general ballpark mix of about 25% He. But get this... I did this with a 1/16" tungsten! Sorry I didn't take a before pic, but it started out as a truncated point, like a crayon shape. It is a 2% lanthanated. Here is what it looked like after:

    Click image for larger version. 

Name:	IMG_0138.jpg 
Views:	1170 
Size:	133.7 KB 
ID:	4671

    It's got some "multiple protrusions", (so is definitely pushing the current limits on it without balling it), but, what's amazing to me is, how the tip didn't melt right off and drop into the aluminum puddle, or even completely "ball" at this current level! I am almost certain if I were using pure argon at 200 amps sustained for several seconds, it would have melted at least a pretty nice sized ball, and maybe even dripped the molten tungsten tip right off. What do you guys think?

    So, putting aside the benefits of the extra and penetration per amp that Helium allows, it seems like there is an additional benefit, that it allows you to run a smaller tungsten (providing further more focused, controllable, and penetrating heat on thick materials.)

    End result: the crack in the .6" thick wheel, I was able to repair with full penetration (from both sides) with the Helium mix and a 1/16" tungsten, with a measured bead width of only .35", (that's just a little bit over half the thickness of the material) without really even trying that hard. I don't think that would have been possible with pure argon.

    (Now in hindsight, I could have further turned up the He% to try further increasing heat per amp, and probably welded this without even needing 200 amps, but I wanted to try this thick wheel with my "usual mix" to see how the tungsten would hold.)
    '13 Everlast 255EXT
    '07 Everlast Super200P

  7. #7
    Join Date
    Feb 2011
    Location
    Fridley, Minnesota
    Posts
    376

    Default

    Note to self "get some helium"
    "It's not magic it's experimental, kind of like washing your hands after pooping used to be." -House

    Everlast PowerTig 250EX-arrived 1-26-2012
    Everlast PowerCool W300-arrived 1-26-2012
    Everlast PowerTig 185 Micro-arrived 1-26-2012
    Everlast PowerPlasma 70-arrived 1-26-2012
    ESAB MigMaster 250-borrowed
    HyperTherm 151 AKA "The Light Sabre"
    Linde UCC-305-964 lb. of old time water cooled TIG love-SOLD-Bad MOJO
    Purox OXY/ACETYLENE

  8. #8

    Default

    Jake,

    Just baiting for more pictures.

    I know the friend projects. God do I know them.

    Maybe they can show the final repair? Or you can cop a picture.

    You might want to explain MAG welding too.
    Mike R.
    Email: admineverlast@everlastwelders.com
    www.everlastgenerators.com
    www.everlastwelders.com
    877-755-9353 x203
    M-F 12 - 7PM PST
    FYI: PP50, PP80, IMIG-200, IMIG-250P, 210EXT and 255EXT.

Similar Threads

  1. Aluminum wheel crack repair
    By jakeru in forum Welding Repairs
    Replies: 8
    Last Post: 06-18-2013, 10:46 PM
  2. Replies: 2
    Last Post: 08-03-2011, 03:50 PM
  3. Project 15 from d3javoodoo % Aluminum Wheel repair #2 %
    By Legacyartist247 in forum Welding Repairs
    Replies: 0
    Last Post: 07-30-2011, 09:43 PM
  4. Replies: 2
    Last Post: 06-02-2011, 07:10 PM
  5. Replies: 0
    Last Post: 06-02-2011, 05:45 PM

Posting Permissions

  • You may not post new threads
  • You may not post replies
  • You may not post attachments
  • You may not edit your posts
  •